July 4th, 2012:
So I was thinking today about the zone-front gown I want to make and the 1780s/1790s stays I will need to make to go underneath it. However, I'm not allowed to start a new corset until my current one is done. So I finally-finally-finally ordered boning for my dark red 1890s corset. Of course, the fabric for the boning channels is still in Halifax, and I am in Toronto until september, but that's beside the point.
I wasn't sure what type of boning to use for the channels on the side, which have the sharpest curves. The original 1890s corset mine is patterned from is boned with extra-wide flat steels, and it has a very sharp bust-waist-hips ratio. So, in theory at least, I could achieve the same sharp waist with flats. However, lots of people find that modern flat steels don't bend sharply enough to achieve the type of waist reduction this corset is made for. So I ordered more boning than I will actually need. I ordered enough boning to fill every channel with an 8mm x .4mm flat steel, which is thinner and therefore springier than a regular 6mm x .6mm flat. I also ordered spiral steels for the three channels with the sharpest bends in them (the ones at the sides and side-fronts). Spirals bend really easily and sharply, to the point where they can get permanent kinks in them if you don't store them correctly. But I don't think they're going to give me the really clean, smooth look on the outside of the corset that makes the original so beautiful. We'll see =D
So here is the first part of the corset diary.
First of all, here is a picture of the original corset:
The pattern is from the book "Corsets: Historical Patterns and Techniques" by Jill Salen.
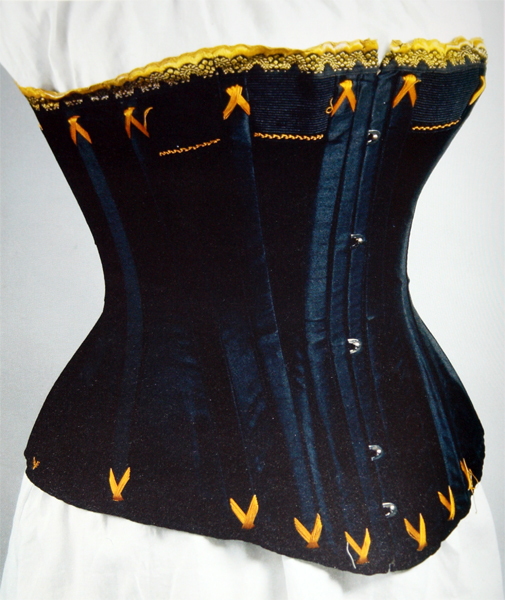
I was inspired by these corsets:


The one on the left is from the 1880s; I'm not sure who currently has it. The one on the right is a Royal Worcester corset from 1876, currently held in the collection of the Metropolitan Museum of Art.
I started by taking my exact measurements and then comparing them with the measurements of the pattern. I compared the b-w-h ratio of the original corset with my own and decided how much waist reduction I wanted and what the final measurements of the corset needed to be. I altered the pattern and then made a muslin, which ended up looking like this:

And then like this:

As you can see, it stretched. It stretched more than 3 inches. That's because every panel is cut on the bias, and my mock-up is made of factory cotton and a thick cotton twill, which stretches a looooot more than the coutil of the final corset. But the mock-up still gave me a chance to see if there were alterations needed to the fit or the shape. I added about an inch and a half to the top at center front and gave it a slight sweetheart neckline, and added about half an inch to the bottom all the way around. Since the pieces are cut on the bias, I took a little more off the waist of the corset to achieve the waist reduction I want, which is about 5". At the same time, I gave myself a little more room through the rib cage (by a little I mean about a 1/4" per side). My final corset is made of white herringbone coutil with an outer layer of a really nice dark red cotton. These two fabrics were cut and sewn as if they are one layer.
I started by stay-stitching all of the panels, since they are on the bias, and inserted the busk. I then corded the tops of the four center-front panels with a thick wool yarn of the same colour as the outer fabric. I used a beading hook to pull the yarn through the pre-sewn channels. Pre-sewing the cording channels prevents the fabric from warping - otherwise you end up with a top piece that is considerably smaller than the bottom piece because it has been zig-zagged up and down over the cording.
Here are the four CF panels after cording. Also, note the backwards busk. Oops. Not sure how I did that, but it doesn't make much of a difference and it's too late to take it out now.

Next, I put the corset together, flat-felling the seams to about 1/4". The boning channels will cover these seams on the outside, but I still want them to look nice on the inside, and flat-felling makes for a very strong seam. I then attached the waist tape. The seams that hold the waist tape down will be covered by the bone casings.
Here is the inside of the corset before the waist tape was sewn down:

With the waist tape sewn down:

Here's the outside:

And here's a close-up of the cording at the top:

There are actually lacing grommets in it now, too, but I haven't taken any photos of it since I put them in. They're silver, and grommety, and 1" apart. I'm sure you can imagine them. ;)
So there it is! Can't wait to finish it and start flossing and embroidering it!
May 6, 2013, after losing weight and opening the whole thing up again for alterations:
Put grommets in today, so the main parts of the alteration are finished =D Yay! Now I just have to re-bind the edges and re-floss the channels. Took some photos in the costume studio.


July 27, 2013:

Good shot of the flossing and cording at the top of the corset, which is unfortunately hidden by the jacket.

Excuse the derpy face and my plate - added this shot because you can really see the shape of the corset. Better photos to come.
February 2015:
(Since I promised better photos, here's the portfolio page - a page like this for each costume can be found under the 'portfolio' tab of this blog.)

No comments:
Post a Comment